Category Archives: RECIPES

Supper-Club Round Up and Recipes

IMG_5124

On a beautiful evening in early August, we were delighted to welcome a select group of diners to our inaugural supper club held at the Bandstand Beds garden which has been mentioned in previous posts on this blog. Seventeen diners joined us for an evening of freshly cooked seasonal vegetarian dishes sourced from the garden itself and from the surrounding area of the common helping to raise funds for Bandstand Beds campaign to create better access to the fast growing plot aiming to further their skills sharing mission statement.

The evening was immensely enjoyable for all and sundry and managed to raise £425 for the project – a significant contribution to the £5,000 target. However, there is still a significant way to go before we have the full sum to get work under way so please don’t feel shy and donate to this very worthy cause that will allow more people to learn from this fantastic skills sharing project.

As ever, we have a little something to wet your appetite with two of our recipes from the evening: ‘Persian’ Ratatouille and Great Grandma’s Welsh Cakes (which were served with a delicious compote foraged from Clapham Common’s fruit trees). Both of these were a hit; so simple to do at home and make for an ideal weekend treat. Adapted recipes for your convenience and enjoyment.

Enjoy!

h&h

IMG_5294

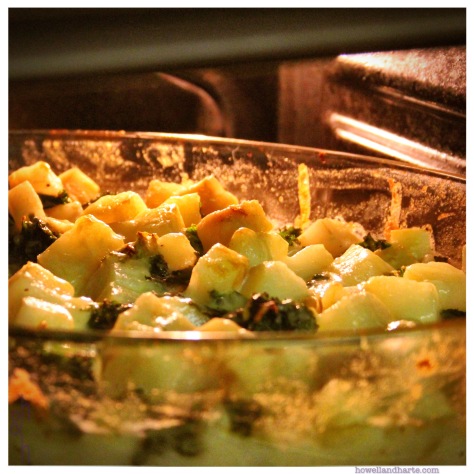
‘Persian’ Ratatouille (serves 4 with rice)

Only ‘Persian’ in the loosest of terms with the addition of saffron and currants adding an extra dimension to a traditional staple of French home cooking. On the day we served this with Thadig, a method of cooking rice common to many areas in the Middle-East and beyond but it would also be equally well accompanied by boiled basmati.

Ingredients:

1 tbsp olive oil

2 cloves garlic, crushed

1 white onion, finely chopped

1 can chopped tomatoes

1 pinch saffron

1 handful of currants

Sliced vegetable, including: red onions; pattipans; courgettes; squash; tromboncini (so long as you have enough to create the circular layered pattern pictured, roughly one of each of these vegetable and 2 of the red onions)

Salt and pepper to season

To serve:

Chopped coriander

Toasted flaked almonds

Preheat your oven to 200C.

Take an ovenproof sauté pan, frying the crushed garlic and chopped white onion in some olive oil over a medium heat. Once they have become soft and appear glassy, add the tomatoes, saffron and currants and allow the sauce to simmer for 10 minutes, stirring to allow the saffron and the sweetness of the currants to infuse into the sauce. Take care that the sauce doesn’t burn, stirring at regular intervals to ensure that the base for your ratatouille doesn’t catch.

Season the sauce to taste and remove from the heat. Ensuring that the sauce is evenly distributed around the base of the pan, begin placing the sliced vegetable around the edges of the pan in a circular pattern so that they stand upright and create a stacked effect – this will allow the vegetable to cook and their exposed edges to crisp and caramelise for additional flavour once in the oven. When the pan is full, place in the oven for 30 minutes or until the vegetables are crisp on the top but cooked in the middle.

Serve with a handful of chopped coriander and toasted flaked almonds.

Great-Grandma’s Welsh Cakes (makes about 18)

A long time favourite, Welsh Cakes have been given a make-over in recents years, with recipes being circulated by renowned food writers and even being stocked on the shelves of Marks & Spencer. However, none are quite so good as this recipe passed down from my great-grandmother, born in lovely Rhondda Fach.

Ingredients:

450g self-raising flour
170g butter
155g granulated sugar
A pinch of nutmeg
A pinch of cinnamon
A handful of currants or sultanas
2 medium eggs
Caster sugar for sprinkling over once cooked
Take a large mixing bowl and the dry ingredients (minus the currants) and combine by hand. Once all the ingredients equally distributed, rub in the butter to create a fine bread crumb like texture to the mix. Add the currants and eggs and mix to a stiff dough. Once thoroughly combined, rap in clingfilm and place in the fridge for 30-45 minutes to allow to stiffen.
Once chilled, roll out the mixture on to a lightly floured surface to a thickness of 1cm (you may have to cut the dough in half to fit it onto you counter) and use cookie cutters to create perfectly round welsh cakes. Stack your Welsh Cakes on top of each other adding flour between each one to make sure they don’t stick together if necessary.
Take a heavy non-stick frying pan, or a traditional bake stone if you are lucky enough to own one, and place over a medium heat. Place a small amount of butter in the pan, ensuring a thorough coating before wiping away any excess with a paper towel to minimise the likelihood of ‘dodgy first batch’ syndrome.
Place the Welsh Cakes in the pan in batches of four or five at a time and griddle for approximately 4 minutes on each side or until golden brown. Once cooked they should still appear to have a thin line of moist dough still running through the middle but not be completely raw inside. Once out of the pan scatter with caster sugar and allow to cool while moving onto the next batch.
Repeat till all the dough has been used up and enjoy still warm with a well earned cup of Glengettie tea or save for later.

Sicily: Secondi

Following on from our latest blog post this is the next recipe in our Sicilian dinner menu. Live in chef’s is part and parcel of the standard family holiday.  As mentioned in our previous post, Sicily: Primi, we had a few mouths to feed and you’ll probably have noticed people gathering around in the background of photos eagerly waiting to be fed, desperate for something to go with a nice glass of wine. However, we did have one night off where we made our way down to Acireale to try some local cuisine. We managed to catch one of the local saint festivals at the same time, arriving to see the holy effigy fly out off a beautiful baroque church on her heavy wooden float at the speed of a canon ball; it was certainly a miracle that there wasn’t a bloody smear of people passata left in her beatified wake. After these wonderful celebrations, solemnised with a round of fireworks, we headed to find some food. And, with an entirely local clientele of archetypal Italian family parties sharing dishes, cracking lobsters and drinking vibrant rosé from carafes from the slopes of Etna, Restaurante I Cavaddari was truly a special find. 

fishThe choices  on offer at Cavaddari were few: fish or fish and pasta. Being an Irish family we would never shy away from a carb.
Note to self, shy away from the carb!
It had to be one of the most incredible meals we have eaten, but by course 7 I think most of us were flagging. Highlights were the Langoustine and squid ink tortiglioni (left), a starter platter that contained no less than 10 different types of fish (from smoked to seared) and Langoustine Risotto. If you ever find yourself on the south east side of Sicily, this is worth a detour. If you do go for the fish and pasta tasting menu, make sure you have a horizontal surface nearby to layout on to allow the food coma to pass before attempting any long journeys – it might take a few days!

The recipe in the second instalment of our Sicily series can be served with or without pasta or with a variety of other dishes, like grilled aubergine or just a plain leaf salad dressed with extra virgin olive oil (Italian, of course).

The simplicity of this dish is what works, you can taste ever single ingredient so if you can get your hands on good produce, this is the recipe to use.


Polpette Pomodoro bake
cropped

Serves 6

Meatballs

500g pork mince
500g beef mince
1 red onion finely chopped
2 teaspoons fresh oregano
1 egg beaten
1 cup of breadcrumbs
Salt and pepper

Sauce

500g of cherry tomatoes, quartered
1 red onion finely chopped
1 clove of garlic, finely chopped
1 tablespoon balsamic vinegar
Fresh basil
1 ball of mozzarella cubed
Salt and pepper

(Pasta optional)

Method

Preheat oven to 175 degrees.

In a bowl combined the minces, chopped onion, egg, oregano, breadcrumbs and salt and pepper.

Using your hands roll in 4cm wide balls place on a plate and chill in the fridge whilst preparing the sauce.

Add the chopped onion and garlic into a saucepan with a glug of olive oil and slowly simmer till cooked.

Add the quartered tomatoes and half the basil to the pan. Cover and simmer for 20 mins till the tomatoes have broken down; then add the balsamic vinegar and season.

In a heavy based frying pan, bring oil up to temperature and add half to the meatballs and brown on all sides transferring to the oven proof dish to finish in the oven.  Repeat with second batch of meatballs until they have all been browned and transferred to the oven.

Once the meatballs have cooked a further 5 minutes, pour the sauce over the meatballs, sprinkle over the mozzarella and return to the oven for 20 mins to cook.

Remove from the oven add the remaining fresh basil, salt and pepper and serve hot with or without pasta.

Buon appetito!

h&h

Sicily: Primi

*It has been a long time since our last post and with one new job and one new house it seemed about time to add a new post to the list too. As it is that time of year again we thought we would do a retrospective on our summer travels from 2016 (check out our instagram feed for pics).*

Don Corleone, A View from the Bridge, The Leopard: that would have been the total sum of my knowledge and experience of Sicily. Yet so much has been written about this wonderful island, the football to Italy’s high-heeled boot. More importantly, all of it is true. Sleepily defying any accusations of hyperbole you happily drive past swathes of olive trees, an incredible vineyard selling their produce by the gallon at the end of the street and Etna smouldering gently (or fiercely) above you.

As with all Italian holidays (and we’ve had a few now), it always comes back to the food. Sicily was never going to be a disappointment and we had some amazing meals, be that slow-cooked donkey in central Catania (sorry Charlie and Libby but they were very tasty) or making our own attempts at a few classics. Here is small plate recipe for you to try out, be that with friends in the warmer weather or to give you some inspiration before you go booking those flights for this year’s adventure.

Arancini NeroScreen Shot 2016-08-03 at 10.47.06

A shot of our own dinner which generally ended up being big affairs. Never get a shop thinking it will last you a few days – you’ll be lucky to get through the evening and have enough in the fridge for breakfast.

Traditionally the zenith of Italian ‘leftover’ cuisine, shelves of golden orbs are to be seen everywhere in Sicily and the rest of Italy, and who can blame them? Bitting into the crisp skin of an arancino al ragu with its pointed tip making it look like a fried teardrop is all persuasion anyone will need to start applying for Italian citizenship!

Meaning ‘little oranges’, arancini have a number of local variants. The teardrop shape is apparently far more of a Sicilian phenomenon while elsewhere they tend to broadly resemble their namesakes.

While we say this is a ‘leftover’ dish, we started making these with the soul aim of producing arancini. In the Italian food bible, The Silver Spoon, the recipe for ‘Arancini alla Siciliana’ equally makes no mention of using up what risotto has been left behind – it is a dish of the highest calibre in its own right. You are welcome to make the risotto on its own but whatever you do you won’t regret it!

Makes 16

For the risotto:

1 white onion, diced
1tbsp olive oil
1tbsp butter
50g oyster mushrooms (or chestnut mushroom if unavailable)
500g black risotto rice
300ml white wine
300ml stock
2 generous pinches of salt
25g parmesan, grated

For the arancini:

4 medium sized eggs
1 ball of mozzarella, in 1cm cubes
1ltr sunflower oil
100g fine bread crumbs

To make the risotto, in medium sized saucepan sauté the onions with the butter and olive oil until glassy. Chop the mushrooms finely before adding to the onions to soften. Once they have softened add the rice to the pan and stir to ensure that it is fully combined with the onions and mushrooms and get a beautifully rich coating of butter and olive oil.

Add the stock, white wine and salt to the saucepan and lower the heat to a simmer. Leave on this heat for 20 minutes or until the rice is soft and all the liquid absorbed. This is where you may need to muster all your patience and culinary judgement to make sure that the mixture is firm and not too wet but not underdone either. The answer is simply to taste the risotto as you go along, checking seasoning and adding any salt and pepper if required.

Once the risotto is cooked, stir in the parmesan and set aside to cool. You can leave this for a couple hours or even over night to help it dry out a little further. (If you want to have risotto on its own at this point, go grab yourself a plate and seize the moment – it would be a shame to let fresh risotto go to waste even if it is for a higher cause!)

To make the arancini, place the risotto mixture in a bowl with 2 of the eggs broken in and combine (this is to help the mixture stick together when placed in the hot oil). To make the balls themselves take a small amount in your hand and flatten it out, placing a cube of mozzarella in the centre. Compress the rice around the mozzarella to form as close to a sphere as you can get – you may need a little more rice to help complete the shape of the arancini. Repeat till you have used up all the rice.

Place the arancini on a plate and cool for 15 minutes in the freezer. With 5 minutes remaining, pour the oil into a saucepan deep enough to cover the arancini and place on a high heat. At this point you should also whisk the two remaining eggs in a bowl. You will also need to have the breadcrumbs ready in a bowl. When you remove the arancini, dip in the eggs followed by the breadcrumbs and plop straight into the now hot oil (you will probably have to do this in batches – we did ours only 5 at a time). Deep fry for 5 minutes before removing and placing on some kitchen towel to catch any excess oil. Serve immediately or as soon as they are cool enough to shovel them into your watering mouths.

Enjoy!

h&h


Mid-week special: Courgetti, chorizo and pine nuts

img_1691

We have been away for a while and have had a few things on the back burner, our write up of our Sicily trip being one of them. Valencia was wonderful; not speaking a word of Spanish made things slightly tricky, not helped by trying to talk Italian instead. God knows how we all found the mental capacity to cope.

We finally got back to gardening on Wednesday, walking up very sheepishly as we haven’t been for months. Luckily, we left with such a bounty of fresh food that we went home to cook one of the freshest recipes we have made in a while. Using a courgette the size of Paddy (washed) and the reddest tomatoes we have ever seen!

fullsizerender

Courgetti with fresh tomato, chorizo and pine nuts 

It’s nothing new Courgetti has been around for a while but the freshness of this dish was out of this world a solid 30 mins from ground to plate. And my was it delicious! Lloyd Grossman jar stand down.
img_1701

Ingredients

1 courgette per person

Handful of toms (plum. Cherry, anything fresh) per person

Half ring of chorizo

1 red onion

Clove of garlic

1 chilli pepper

2 tsp of hot paprika

Salt and pepper

On a high heat fry the chorizo and removed when cooked. Using the oil from the chorizo, fry the onion, chilli and garlic over a low heat. Once soften turn up the heat and add the paprika and halved toms. Simmer till soft and cooked through.

In a separate pan toast the pine nuts until they start to turn golden brown but be careful to not let them burn. Meanwhile, in a frying pan heat the Courgetti with olive oil, seasoning with salt and pepper when soft.

Serve the Courgetti with the sauce and scatter the toasted pine nuts – might not be from the allotment for everyone but it will be the tastiest courgette you’ll get!


h&h

Japan-easy

IMG_9025
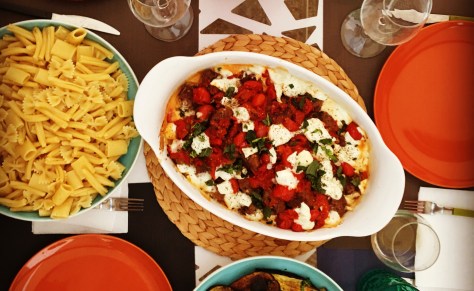
The West has been fascinated by Japan for centuries. As ‘the land of the rising sun’, it has been characterised by its exotic strangeness to us combining finely crafted beauty, an unrivalled artisan culture and (most of all) exceptional food.

Japanese food does not automatically spring to mind when dreaming up a simple home-cooked meal. Our ‘discovery’ of sushi in the 90s with unironically kitsch little Japanese restaurants each bordering of a charicature of itself helped to make Japanese food the latest thing; Yo Sushi thrives to this day on that reputation and our nation’s first populist brush with meals largely consisting of raw fish. Wagamama came later, offering us smoldering bowls of ramen and satisfyingly girthy udon noodles. We lapped them both up, but still we didn’t try this at home.

So why don’t we? The supply of South-East Asian staples has improved dramatically over the last twenty years partly because of the popularity of these restaurants; are there any excuses left? Are we just being lazy? Scaredy cats, even?

With this in mind, we have tried to create some easy and highly ‘Western friendly’ interpretations of Japanese cuisine. If you’ve felt fear at the thought of which vermicelli to use in your artisan spring rolls quake no longer; howellandharte are here and we’re going to sort you out.

Sushi: Lettuce Hand Rolls

IMG_9005Sushi horror stories are penny-a-dozen. Seaweed, rice and some fish: how hard could it be? Considering sushi chefs typically spend around 5 years training (and only then are they allowed to make the rice by themselves) possibly quite tricky as anyone who has felt like dabbling at a little sushi making will already know.

This is recipe is a cheat: there is no seaweed and to make up for the loss of flavour we have included tobacco onions to give things a little more character.

One piece of advice: make sure you have some serious weapon-grade tuna. Freshness is key to sushi if you don’t want to be chewing on some mushy, slimy thing in an unflattering overcoat of savoury rice-pudding. Go to your fish counter or even better a local fish monger: we went to Moxon’s by Clapham South tube station who had some excellent sushi-grade yellow-fin tuna in stock. Same goes for salmon or any other fish you may wish to use.

Remember, the recipe below is a suggestion of what to put in your handroll – this should be a ‘fajita-style’ meal so get stuck in and improvise.

Serves 4

Ingredients:

Cooked Sushi Rice (recipe here)

1 Onion, halved and sliced into half-moon strips

50ml Milk

20g Plain Flour

100ml Sunflower Oil

1 Lettuce

2 Avocadoes

160g Yellow Fin Tuna

260g Fresh Salmon

Soy sauce, wasabi paste and pickled ginger to serve.

To make the tobacco onions, first out the oil onto a high heat so that it gets very hot. Take the half-moon strips of onion, dip them in milk and then coat thoroughly in flour. Repeat this process until you have all of the strips finely coated in a powdery batter. Place in the hot oil and cook until golden brown. You may have to cook the onion in batches but once each batch is done place it on some kitchen paper so any excess fat can drain off and sprinkle over a little table salt to season. Set aside and allow to cool.

Pick apart the separate leaves of the lettuce, ensuring that they stay in tact. Wash them to remove any dirt, shake and set aside in a large bowl.

To prepare your fillings, start with the avocados. Remove the stone and try to scoop out each of the halves with a spoon and cut into strips on a chopping board. When you think you are ready to serve start cutting the fish into similar manageable strips and serve on a platter.

Place all the components on the table ready to serve. Each diner should take a lettuce leaf and a spoonful of sushi rice pressing it down into the leaf with their thumb. Once flattened they can then add their choice of filling and fish as well as any of the condiments they wish. Repeat and enjoy!

Japanese-style Coleslaw

Serves 4 (as a side dish)

Ingredients:

3tsps sesame seeds

1tbsp Mayonaise

1/4tsp Wasabi

2 carrots

1/2 a medium sized cucumber

1 spring onion, finely matchsticked

In a small pan, lightly toast the sesame seeds over a medium heat until they start to turn golden.

Prepare the wasabi mayonnaise, mixing the two ingredients together in a small dish or pot. You can make the mayonnaise more or less potent according to taste but bare in mind that you don’t want to blow people’s heads off. To adjust simply add more or less of either ingredient.

Grate the carrots and place in a large bowl. Grate the cucumber but once this is done put into a sieve and press down lightly in order to remove excess liquid – you do not want this to become a wet mess. When the cucumber has been drained, place in the bowl with the carrots.

Add the spring onions and toasted sesame seeds to the cucumber and carrots. Mix in the wasabi mayonnaise. Serve straight away.

Refreshing Cucumber Salad

Screen Shot 2016-07-15 at 16.41.46

Serves 2 (as a side dish)

Ingredients:

1/2 cucumber, matchsticked

1 fistfuls rocket

2tsps nigella seeds

1tbsp toasted sesame oil

1tbsp soy sauce

Place the cucumber and rocket in a medium sized salad bowl or serving dish. Pour over the oil and soy sauce and toss thoroughly. Scatter half of the nigella seed over the salad and toss again. Scatter the remaining nigella seed over the top of the salad and serve.

Get a peas of this: Pea bruschetta

IMG_0049

Another light bite from us which we have been making for a while for dinners but also as a good option for a summery lunch.  We’ve also served this dish as a starter for dinner parties – perfect fresh start to an evening of wining and dining. As a protein and vitamin rich vegetable, peas are also an ideal addition to your spring salads for those amongst you who are thinking seriously about potential picnicking options! Enjoy!

*Other variations include replacing the parsley with mint or tarragon and add a generous helping of crispy chorizo.

Ingredients:

1 Echelon Shallot, finely diced

300g Frozen peas

A small handful of parsley

Olive oil

Juice of 1/2 lemon

Salt and pepper to season

Wholemeal sourdough bread

150g lardons

Method:

Mixed with a decent slug of cold olive oil, place the shallot into a cold frying pan. Give the oil and shallot a stir before placing on the heat. Cook until thoroughly browned and remove from the heat.

In the mean time boil a kettle of water. Place the peas in a saucepan and pour over boiling water and place on a medium to high heat. Once cooked drain the peas, return them to the pan, crush and then add the onions.

Squeeze the juice of half a lemon, season and add the chopped parsley.

Serve warm on a slice of toasted wholemeal sourdough with a hearty G&T.

h&h

Jerk it out

We came up with this jerk seasoning recipe the year we lived in Brixton.  Before that we had never really tried jerk seasoning unless it came out of a Dunn’s River jar (which we aren’t shirking: it is delicious and can definitely be a good substitute for the burger recipe below).

Away from the chic new restaurants of Brixton Village, you can walk into some of the most interesting and unassuming shops cooking the best jerk chicken imaginable.

As part of a christmas present and the reflect the area that we lived in we did some research into what made the best jerk seasoning recipe, taking inspiration from other blogs and websites.

The seasoning we have ended up with goes perfectly coating a succulent chicken breast or salmon fillet, as well as burgers (recipe below).  As in a pervious post about spices we suggest going to Aziz Cash and Carry on Electric Avenue for all the ingredients you might need.

Warning – Don’t sniff this seasoning when it is done: dried scotch bonnet powder up your nose is not something you will forgot easily!

Jerk Seasoning
(make one large jar)

2 Tbsp dried thyme

2 cinnamon sticks milled or 1 tbsp cinnamon powder

2 Tbsp died coriander leaves

1 Tsp crushed coriander seeds

2 Tbsp crushed black peppercorn

1 Tsp ground nutmeg

3 Tsp allspice

1 Tbsp dried garlic flakes (available in Aziz)

4 Dried scotch bonnets

half a thumb of dried ginger

dried zest of two limes (zest and leave on a plate for a couple of days to dry)

Instructions

First, to dry the scotch bonnets and ginger, preheat the oven to 175C. Slice the ginger thinly as possible and place on a baking tray lined with greaseproof paper. Chop scotch bonnets into 1cm square chunks and deseed, place cut side down on the greaseproof paper and cook both for 6-8 hours till dried.

Mix all ingredients together a large bowl or a blender. Mix or whiz them together making sure that the mix is evenly combined and of the same consistency.

Pour into a clean dry jar and you can keep this for up to 6 months.

IMG_0516


Jerk Burgers with caramelised red onions and simple green salad.

makes 4 – 6 burgers

Ingredients

500g beef mince

1/2 chopped onion

1 tbsp jerk seasoning

1 egg

2 red onions

2 tbsp brown sugar

1-2 tbsp balsamic vinegar

Salad recipe here.

Burger buns


Instructions

Add the mince, chopped onion, jerk seasoning and egg to a bowl and combine. Leave to the side whilst you prep the onions.

Half and slice the onions and add to a saucepan on a low heat with 1tbsp olive oil; cook slowly for 15-20 minutes.

Returning to the burger, shape the mixture into 4-6 patties (depending on how chunky you want them). Lightly oil a frying pan with sunflower oil and place on a medium heat. Cook the burgers for 5 minutes on each side till brown and caramelised.

Whilst the burgers are cooking add the sugar and vinegar to the onions and continue to cook for another 5 – 1o mins.

To build the burgers simply add the patties to the buns with slice of fresh tomatoes and a spoon full of caramelised onions and any other condiments you like.

Enjoy!

h&h

Get dressed

Spring-time is well and truly here and as food magazines start to push their fanciest of salads for you to spend hours chopping and garnishing, we have a few low-maintenance ways of injecting big flavours into your food. As well as a recipe or two for you to bring to work or serve as an accompaniment to a main meal, we have our one piece of killer advice if you want to keep up with food trends of 2016…

IMG_8947

Unrefined Sunflower Oil

Sounds new-age? ‘Unrefined’ already making you pat your wallet in fear? While this could be a scary prospect even for the most regular customers at Whole Foods, unrefined sunflower oil is a deliciously nutty ingredient for dressing your salad. Not to be confused with its refined brother that frequents the fast-food chains of the world, it is painfully healthy containing a mixture of poly- and mono-unsaturated fats high in omega-6. We first tried this when tasting Olia Hercules‘ Chilli and Garlic Cucumber salad in her debut cook book, Mamushka (worth buying for a number of reasons but this recipe is certainly one of them). Since then this oil has become a staple for us in a very simple dressing salad combination which anyone can try.

Simple salad and dressing:

Ingredients:

3 parts unrefined sunflower oil

1 part balsamic vinegar

1 part soy sauce

A mixture of salad leaves (rocket, watercress and pea-shoots work well)

Pour the ingredients for the dressing into  a jam jar or other sealable container. Shake the dressing mixture vigorously for a few moments until it is fully combined. Taste and season with black pepper if desired.

Wash the mixed salad leaves and toss till dry. Place the leaves into a large bowl and pour over the dressing. Toss thoroughly again to ensure that the dressing is mixed together with the leaves throughout. Serve immediately.

Hearty couscous salad:

IMG_8931

Lumpy. Stodgy. Unsettlingly glutinous. Couscous can be done in all the wrong ways. If you’ve had a bad brush with it in the past though, it is time to forget it and embrace this recipe. Aromatic, herby and with a few pomegranate kernels sprinkled on top for pallet punching sharpness, our couscous will definitely get your lunchtime mojo going or compliment some lovely köfte (turkish meatballs) and Babaganoush (recipe below) for a Middle-East feast. It also contains celery leaves, a recognised ‘sirt’ food for those of you interested in losing a little weight. If this is the case you may want to replace the sunflower oil with olive oil, another recognised ‘sirt’ ingredient.

Dressing:

3 tbsp unrefined sunflower oil

3 tbsp pomegranate molasses

Ingredients:

190 g couscous

2 tsps cinnamon

a generous pinch of salt

1/2 medium sized red cabbage, chopped into strips 3cm x 0.5cm

6 sprigs of mint, roughly chopped

2 handfuls of celery leaves, roughly chopped

a handful of pomegranate kernels to serve (optional)

Place the couscous in a large heatproof bowl and sprinkle over the cinnamon and salt, making sure they are both evenly distributed throughout. Pour over boiling water, enough just to cover the couscous. Put this to one side and leave it to absorb. This should take about 20 – 25 minutes.

Chop and prepare all the ingredients for the salad and place in a large bowl in which you want to serve the couscous salad.

Once the couscous has absorbed the water, run your hands through it making sure that it is not too hot or that you will burn yourself. Using both hands, pick up small amounts of the couscous and rub between your fingers in a backwards and forwards motion letting them be ‘fluffed up’ and separated. Once they are thoroughly fluffed and cool enough, add them to the rest of the salad and mix together.

Combine the oil and molasses to make the dressing. Pour over the top of the combined couscous salad and stir to mix through. Scattering a handful of pomegranate kernels over the top serve straight away.

IMG_8936
Our Middle Eastern feast featuring our hearty couscous, babaghanoush and a fantastic beef salad from Sabrina Ghayour’s Persiana

Babaghanoush:

Smoky and sharp but mellow and light, some might not think of this as a salad and more of a dip, but it still makes a good accompaniment to a main meal or as an extra vegetable boost to bring into the office. Be warned – for this recipe you will require a gas cooker, or alternatively, you can use the flames of a barbecue if you feel in a more summery mood.

Ingredients:

2 medium sized aubergine

1 lemon

olive oil

Salt and pepper to season

a handful of chopped coriander

Preheat the oven to 200 C. Turn on one of the gas hobs and lie the aubergines in the flame, charring the skin. You will need to leave them to char gently but keep a watchful eye to make sure they do not become too burnt. Turn them periodically to make sure they are charred all over. 5 minutes of this should be sufficient but you can extend the charring time if you want an especially smokey dip.

Place the aubergines in a baking dish and put in the oven for 20 minutes. Check after 10 minutes as you may need to extend baking time depending on how big a baking dish you have used. When it is soft enough to pull apart with a pair of spoons, scoop out the insides leaving behind the charred skin and put into a food processor. Add the juice of half a lemon and a glug of olive oil, as well as salt and pepper to season the dip. Blend the aubergine thoroughly and taste to check seasoning. Add some chopped coriander and serve still warm or save for later in a sealable container, allowing it to cool before placing in the fridge.

Irish Stew

IMG_8922

Ireland doesn’t always stand out as one of the great culinary contributors to world cuisine. Exotic? No. A satisfier-of-the-masses with delightful takeaway dishes? No. In fact, the country’s most well-known contribution can probably be summed up in three items: Guinness, Tayto crisps and Barry’s tea.

With this in mind we have decided to offer you another option for this year’s coming St. Patrick’s Day celebration other than swilling Guinness, devouring cheese and onion Tayto’s and nursing yourself with a nice cup of Barry’s the next day of course. Irish Stew can be deemed the national dish of Ireland but, despite coming from an Irish family, I don’t think I have ever eaten it let alone actually cooked this dish.

As we all know it rains a lot in Ireland… A LOT! But the simplicity of the flavours and great ingredients means this dish will warm you up on the most miserable of days. The best meat to use would be lamb neck, but we know from hard earnt experience the only place to find that would be a butcher and could possible break the bank.

We have used simple diced lamb chunks from our local supermarket, and created a fantastic stock from deglazing the pan. A tip when browning the meat – DO NOT STIR!! Leave it there till it caramelises and the meat will simple come off. This also gives it a beautiful mahogany-brown colour.

Enjoy with a cold Guinness or, as we did, a glass of Club Orange.

IMG_8916

Irish Stew

Serves 6
20min prep
60min cooking

500g   Floury potatoes (Maris Pipers or King Edwards)
500g   Waxy potatoes (New potatoes or charlotte potatoes)
3          onions (one quartered and other 2 chopped into thick rings)
1 bay leaf
Fresh Thyme
Black peppercorns
1kg      carrots (peeled and thickly chopped)
1kg      Lamb stewing steak
1ltr      cold water
200g   smoked streaky bacon (cut into strips)
Salt and pepper (to season)
Chopped chives

Start by peeling and cut into chunks the floury potatoes and leave them in a bowl of cold water to prevent them browning. Cut the waxy potatoes in half no need to peel, again leave them in a bowl of cold water.

Quarter one onion and roughly chop one carrot. Place this in a small saucepan with bay leaf, 2 sprigs of thyme and 6 black peppercorns.

Heat 1 tablespoon of sunflower oil in a heavy bottomed pan. Once it has come up to the heat, batch cook the lamb placing the cooked lamb in a dish to stand. Deglaze* the pan in-between batches, pour this liquid into the saucepan with the onions, carrot, bay and peppercorns keep this on a low simmer; this will become the stock for the stew.

Once the lamb is cooked do the same with the bacon till crispy and set aside with the lamb, again deglaze the pan and add this to the liquid to the stock to simmer away.

Heat 2 tablespoons of sunflower oil add the onions and turn down the heat. Cook them down till soft and sweet.

Once the onions are cooked add the meat, the remainder carrots, floury potatoes and strain the stock into the pot, adding more water to cover the meat as necessary. Bring to the boil and lower the heat to cook for 10 minutes. After 10 minutes skim the water and add the waxy potatoes and few sprigs of fresh thyme and continue simmering for 20 minutes or till lamb is tender.

Season with salt and pepper to taste and serve with chopped chives.

*remove the lamb and pour cold water into the pan to remove the cooking liquids

h&h


Celeriac, Potato and Kale Bake


It’s been a little while since our last blog post – a few things have been in the pipe line but bigger things are on there way. We promise!!

This recipe is a winter warmer – relatively healthy comfort food to keep you going in the series of cold snaps we have had throughout the last few weeks to make up for what has been a generally warm winter so far. All vegetarian, filling, and comforting with the satisfying blend of root veg and (occasionally much maligned) kale to add colour – you can almost feel the newly restored warmth coming of you already. Enjoy!

IMG_0513 2

Ingredients:

Sauce:

300 ml white wine

300 ml stock

10 g corn flour

160 g cheddar cheese + extra for topping

salt and pepper to season


Bake:

1 celeriac

3 potatoes

150g kale


Preheat the oven to 200 degrees Celsius.

Chop the celeriac into chunks of about 1.5 cm. Once chopped, place in a large saucepan with cold water and bring to the boil. In the meantime chop the potatoes into similar size chunks. After the celeriac has cooked for 5 minutes, add the potatoes to the boiling water. Cook for 10 minutes before placing the kale on top of the saucepan in a colander and steam for 5 minutes or until all the vegetables are cooked. Place in a oven proof dish and leave while you prepare the sauce.

For the sauce, reduce the wine to about a tenth of the quantity in a small pan. Add the stock to the reduction and heat through. Taking a few tablespoonfuls of the stock mixture and add it to the corn flour, mixing the two together to create a smooth paste. Once thoroughly combined, add to the rest of the stock mixture and stir. Add the cheese and stir until it is melted.

Once the sauce is fully combined, pour over the celeriac, potatoes and kale. Grate cheese over the top of the dish and bake in the oven for 20 minutes. Serve with a few grinds of black pepper fresh from the oven.

h&h